
개요
If you wish to quickly integrate and experience the features of BeautyAR, we recommend adopting the Integrating UIKit approach.
For those integrating beauty effects alongside MLVB SDK /TRTC SDK /Short Video SDK(UGSV), please follow the integration guidelines for Integrating With MLVB SDK, Integrating With TRTC SDK , and Integrating With UGSV SDK respectively.
If you prefer not to use UIKit and instead directly implement Core SDK interface calls, you may proceed with this guide for integration.
Environment requirements
Xcode 11 or later.
Recommended runtime environment:
Device requirements: iPhone 5 or later. iPhone 6 and older models support up to 720p for the front camera.
System requirements: iOS 10.0 or later.
Importing the SDK
You can use CocoaPods or download and import the SDK manually into your project.
1. Install CocoaPods
Execute the following command in the terminal window to install CocoaPods. If you have already completed the installation of CocoaPods, you can skip this step.
sudo gem install cocoapods
2. Create a Podfile
Enter the project root directory in the terminal window and execute the following command to create a Podfile for the project.
pod init
3. Edit the Podfile
Choose the appropriate version based on your project plan, edit and save the Podfile.
#Please install the corresponding library according to your package#For example: your package is A1-00pod 'TencentEffect_A1-00', :podspec => 'https://mediacloud-76607.gzc.vod.tencent-cloud.com/TencentEffect/iOS/podspec/latest/TencentEffect_A1-00.podspec'#For example: your package is S1-07pod 'TencentEffect_S1-07', :podspec => 'https://mediacloud-76607.gzc.vod.tencent-cloud.com/TencentEffect/iOS/podspec/latest/TencentEffect_S1-07.podspec'
4. Update and install SDK
Enter the following command in the terminal window to update the local library file and install the SDK.
pod install
5. Post-integration configuration
Modify the Bundle Identifier to be consistent with the applied test authorization.
Add camera permission description (Privacy - Camera Usage Description) in Info.plist.
If your package includes motion effects and filter functions, you still need to download and import the bundle materials under motionRes according to the "Import Materials" section below.
Starting from version 4.2.0.21, the Tencent Effect SDK supports integration with Swift Package Manager (SPM).
1. Choose a Package repository
In order to reduce the size of the installation package, the SDK is split into two SPM warehouses based on packages. Please choose according to the package you purchased:
Package | SPM Repository URL |
A1-00, A1-01, S1-00 | |
A1-02 to A1-06, S1-01 to S1-07, X1-01, X1-02, All |
2. Add the Package
Open your Xcode project, select File > Add Package Dependencies..., paste the URL of the corresponding repository into the search box, wait for it to load, and then click Add Package.
3. Choose a version
In Choose Package Options, set the Dependency Rule. It is recommended to select Up to Next Major Version to automatically get the latest compatible version.
4. Choose a package
In Choose Package Products, select the Product to integrate and the target. Each package provides three Product variants:
Product suffix | Description |
No suffix, (e.g. TencentEffect_S1-07) | Includes the SDK binary libraries and the resource bundle (XMagicResources). |
_nobundle (e.g. TencentEffect_S1-07_nobundle) | Includes only the SDK binary libraries, without the resource bundle. |
_nolibpag (e.g. TencentEffect_S1-07_nolibpag) | Excludes libpag but includes the resource bundle. |
5. Post-integration configuration
In Build Settings, add
-ObjC to Other Linker Flags.Change the Bundle Identifier to match the test license you have applied for.
Add the camera usage description to Info.plist (Privacy - Camera Usage Description).
If your package includes animated effects and filters, you still need to download and import the bundle assets under motionRes as described in the "Importing Assets" section.
1. Integrated SDK
1.1 Download the SDK and effect resources and decompress the file. The SDK is in the
frameworks folder, and the bundle resources are in resources.1.2 Open your Xcode project and add the frameworks in the
frameworks folder to your project: Choose the target to run.1.3 Select the General tab, expand Frameworks, Libraries, and Embedded Content, and click + to add the frameworks downloade.
1.4 Including
XMagic.framework, YTCommonXMagic.framework, libpag.framework, TECodec.framework, as well as MetalPerformanceShaders.framework, JavaScriptCore.framework, VideoToolbox.framework, libc++.tbdandlibsqlite3.tbd. 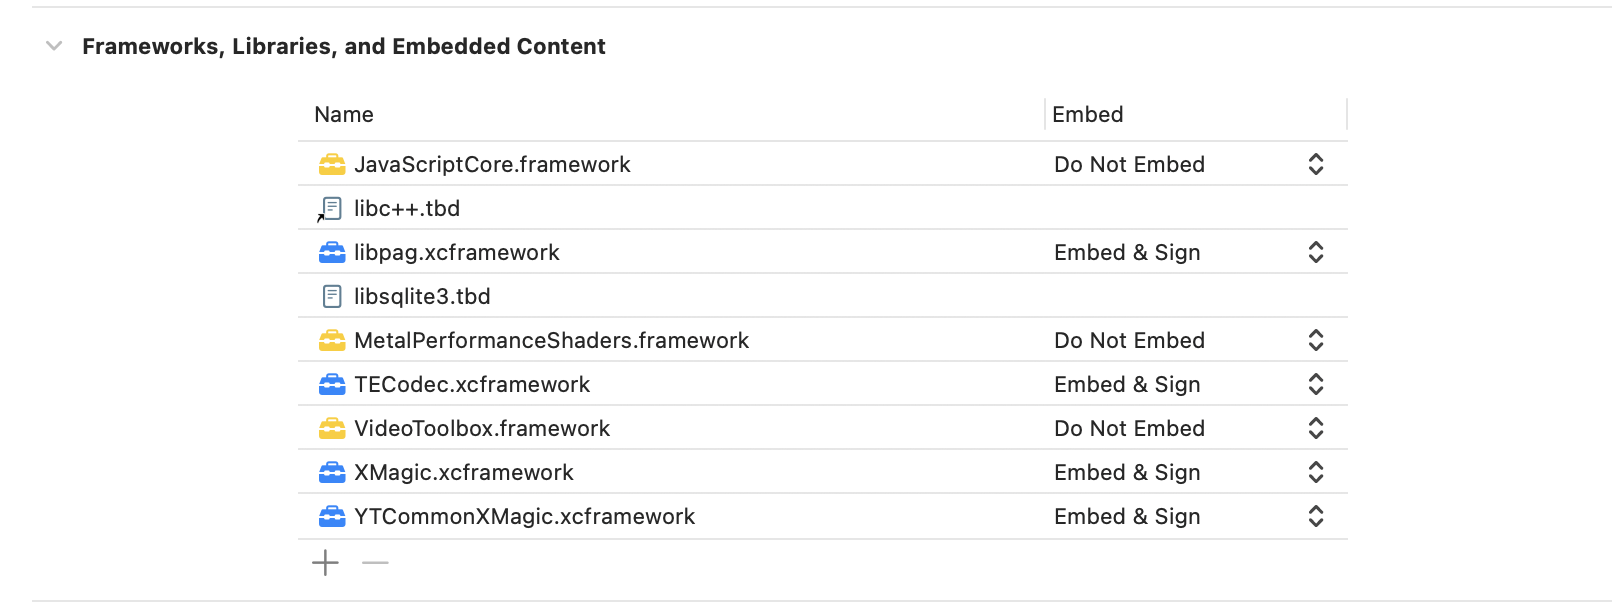
2. Post-integration configuration
Under the Build Settings tab, add
-ObjC to Other Linker Flags.Change the bundle ID to the bundle ID bound to your license.
Add the camera usage description to Info.plist (Privacy - Camera Usage Description).
If your package includes animated effects and filters, you still need to download and import the bundle assets under motionRes as described in the "Importing Assets" section.
To reduce the SDK package size, you can dynamically download the necessary module resources and animated effect resources (
MotionRes, not available in some basic editions of the SDK) from a URL and, after download, pass the path of the resources to the SDK.You can use your existing download service, but we recommend you use the download logic of the demo. For detailed directions on implementing dynamic download, see Reducing SDK Size.
Importing the effect resources
If your package includes dynamic effect and filter features, you need to download the corresponding resources from the SDK Download Page, After unzipping, import the bundles from the `resources/motionRes` folder into any directory of your main project as needed. After importing, it should look like the image below, where `lut.bundle` contains the filter resources and the others contain the animation resources.

Configuring permissions
Add permission descriptions in the
Info.plist file. If you don’t do so, the application will crash on iOS 10. Grant the application camera access in Privacy - Camera Usage Description.Directions
Step 1. Authenticate
1. Apply for a license and get the
LicenseURL and LicenseKEY. See Activate the Service.2. Set the URL and key in the initialization code of your business module to download the license. Avoid downloading it just before use. You can also trigger the download in the
didFinishLaunchingWithOptions method of AppDelegate (the values of LicenseURL and LicenseKey are generated when you bound the license in the console).If your SDK version is earlier than 2.5.1, you can find
TELicenseCheck.h in XMagic.framework; if your SDK version is 2.5.1 or later, TELicenseCheck.h is in YTCommonXMagic.framework.The SDK can only be used after successful authentication.[TELicenseCheck setTELicense:LicenseURL key:LicenseKey completion:^(NSInteger authresult, NSString * _Nonnull errorMsg) {if (authresult == TELicenseCheckOk) {NSLog(@"Authentication successful");} else {NSLog(@"Authentication failed");}}];
Authentication error codes:
Error Codes | Description |
0 | Successful. |
-1 | The input parameter is invalid; for example, the URL or KEY is empty. |
-3 | Download failed. Check the network settings. |
-4 | Unable to obtain any Tencent Effect authentication information from the local system, which may be caused by an I/O failure. |
-5 | The VCUBE TEMP license file is empty, which may be caused by an I/O failure. |
-6 | The JSON field in the v_cube.license file is incorrect. Please contact Tencent Cloud team for help. |
-7 | Signature verification failed. Please contact Tencent Cloud team for help. |
-8 | Decryption failed. Please contact Tencent Cloud team for help. |
-9 | The JSON field in TELicense is incorrect. Please contact Tencent Cloud team for help. |
-10 | The Tencent Effect authentication information parsed online is empty. Please contact Tencent Cloud team for help. |
-11 | Failed to write Tencent Effect SDK authentication information to the local file, which may be caused by an I/O failure. |
-12 | Download failed, and failed to parse local assets. |
-13 | Authentication failed. |
Others | Please contact Tencent Cloud team for help. |
Step 2. Initialize and use the SDK
The following is the process of using the Tencent Effect SDK:
1. Initialize the Xmagic.
/// root_path passes in the directory where LightCore.bundle is located/// When integrating Cocoapod: [[NSBundle mainBundle] bundlePath]/// When SPM is integrated: [[[NSBundle mainBundle] bundlePath] stringByAppendingPathComponent:@"Frameworks/XMagicResources.framework"]/// renderSize is the image resolution, taking 720p as an exampleNSDictionary *assetsDict = @{@"core_name" : @"LightCore.bundle",@"root_path" : @"Pass here the directory path where LightCore.bundle is located"};self.xMagic = [[XMagic alloc] initWithRenderSize:CGSizeMake(720, 1280) assetsDict:assetsDict];
2. Set beauty effects
/// Whitening[self.xMagic setEffect:@"beauty.lutFoundationAlpha" effectValue:50 resourcePath:nil extraInfo:nil];/// smooth[self.xMagic setEffect:@"smooth.smooth" effectValue:50 resourcePath:nil extraInfo:nil];
3. The SDK processes each frame of data and returns the results.
/// Take the device camera data output as an example/// sampleBuffer:Data output by the device camera-(CMSampleBufferRef)didProcessCPUData:(CMSampleBufferRef)sampleBuffer{CVPixelBufferRef pixelBuffer = CMSampleBufferGetImageBuffer(sampleBuffer);YTProcessInput *input = [[YTProcessInput alloc] init];input.pixelData = [[YTImagePixelData alloc] init];input.pixelData.data = pixelBuffer;input.dataType = kYTImagePixelData;YTProcessOutput *output = [self.xMagic process:input];if (output.pixelData.data != nil) { //output.pixelData.data:Data processed by Beauty Effeck SDKCMSampleBufferRef outSampleBuffer = [self sampleBufferFromPixelBuffer:output.pixelData.data];return outSampleBuffer;}return nil;}/// PixelBuffer to sampleBuffer- (CMSampleBufferRef)sampleBufferFromPixelBuffer:(CVPixelBufferRef)pixelBuffer{CFRetain(pixelBuffer);CMSampleBufferRef outputSampleBuffer = NULL;CMSampleTimingInfo timing = {kCMTimeInvalid, kCMTimeInvalid, kCMTimeInvalid};CMVideoFormatDescriptionRef videoInfo = NULL;OSStatus result = CMVideoFormatDescriptionCreateForImageBuffer(NULL, pixelBuffer, &videoInfo);result = CMSampleBufferCreateForImageBuffer(kCFAllocatorDefault, pixelBuffer, true, NULL, NULL, videoInfo, &timing, &outputSampleBuffer);CFArrayRef attachments = CMSampleBufferGetSampleAttachmentsArray(outputSampleBuffer, YES);CFMutableDictionaryRef dict = (CFMutableDictionaryRef)CFArrayGetValueAtIndex(attachments, 0);CFDictionarySetValue(dict, kCMSampleAttachmentKey_DisplayImmediately, kCFBooleanTrue);CFRelease(videoInfo);CFRelease(pixelBuffer);return outputSampleBuffer;}
4. Release the Xmagic .
/// Called where SDK resources need to be released[self.xMagic deinit];