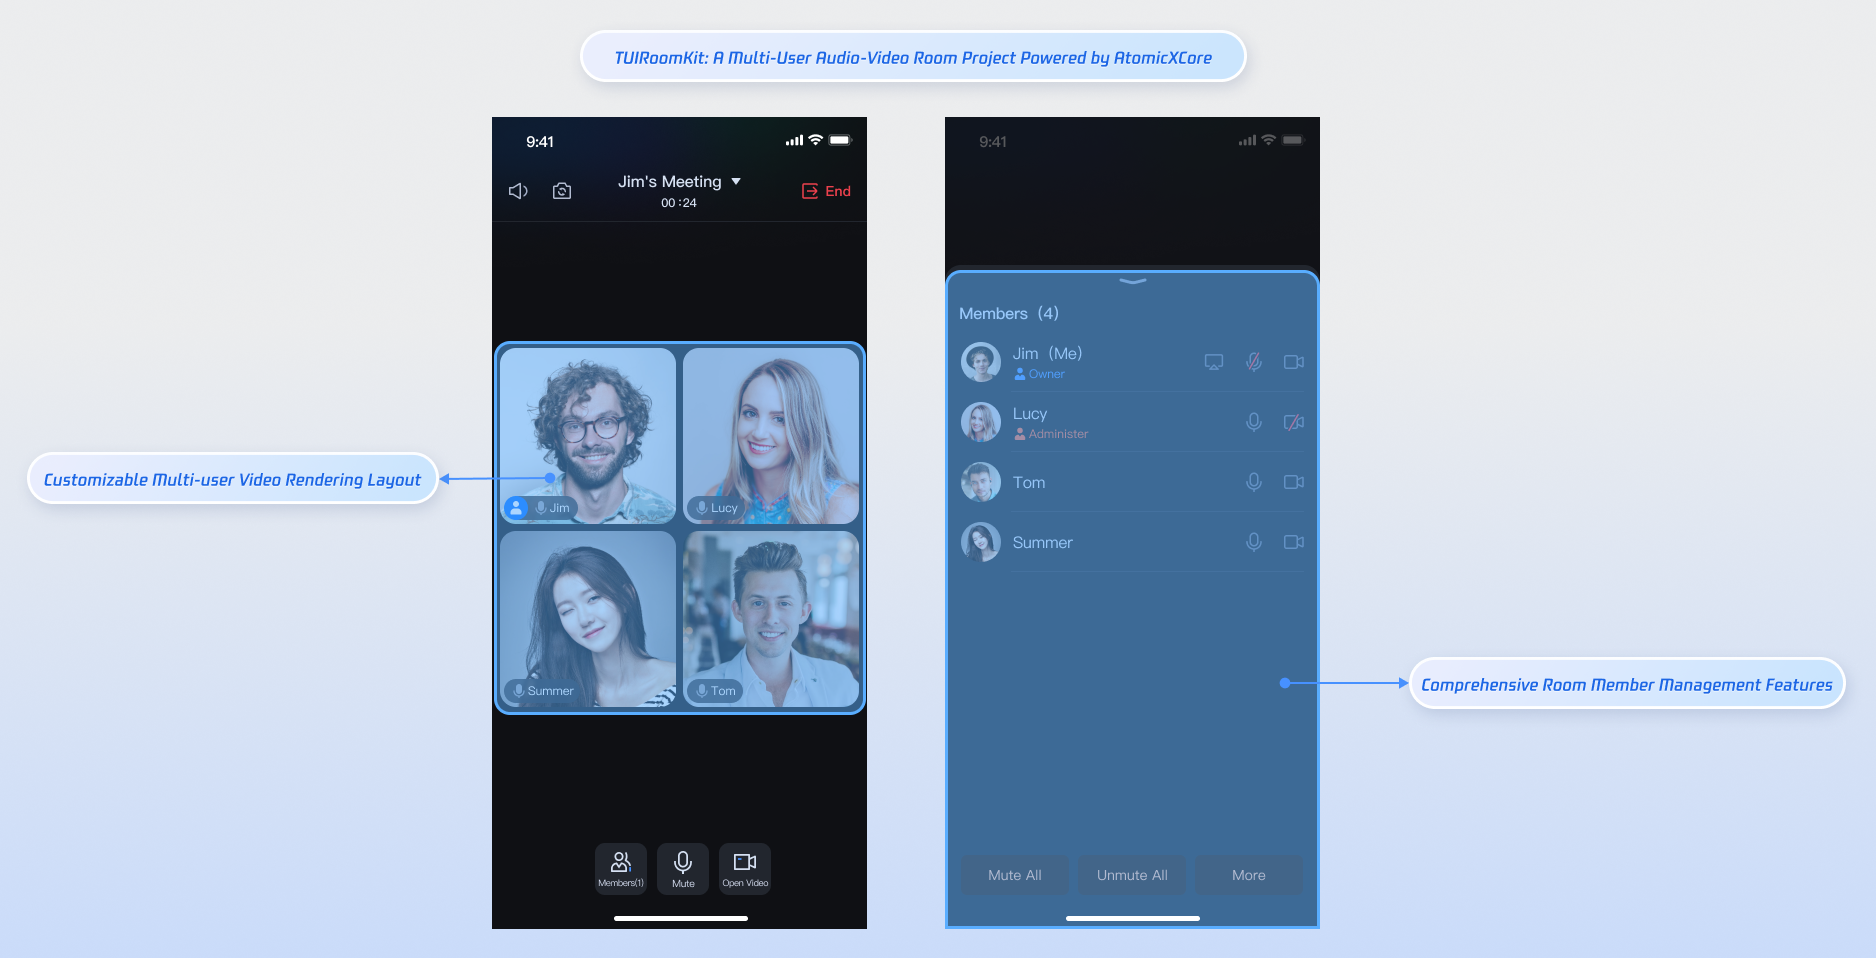
This document provides an integration guide for the core features of AtomicXCore, enabling developers to quickly build multi-party audio/video conference rooms. The SDK follows a pure API architecture, giving you full control over UI customization while letting you focus on business logic and user experience.
Key Features
AtomicXCore offers three essential modules for developing multi-party audio/video conference rooms:
RoomStore: Centralized room management, including scheduling, creating, joining rooms, and in-room calling.
RoomParticipantStore: Participant management within a room, covering admin settings, host transfer, removing participants, device control, and more.
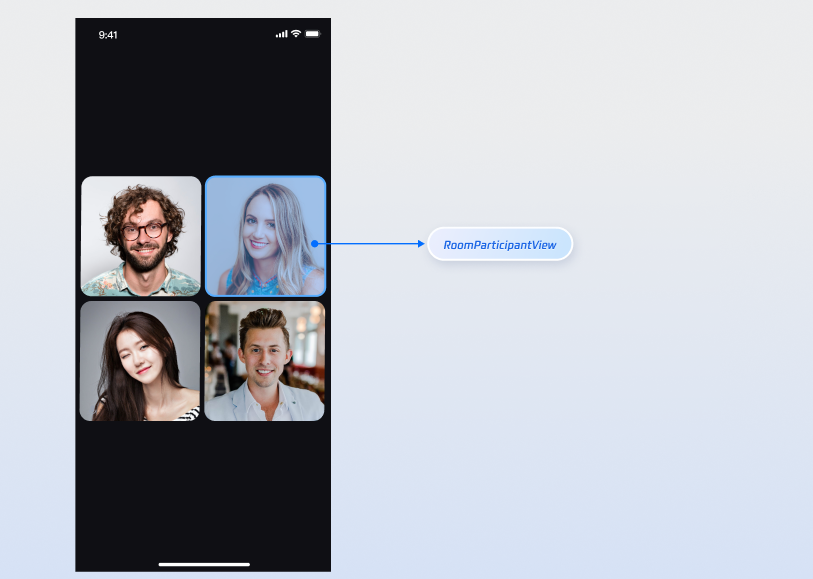
RoomParticipantView: Video view for displaying participant streams within the room.
Install CocoaPods via gem: Run sudo gem install cocoapods in your terminal.
Tip:
During sudo gem install cocoapods, you may be prompted for your computer password. Enter your administrator password as instructed.
Step 3: Integrate the AtomicXCore SDK
1. Add Pod Dependency:
If you already have a Podfile
If you do not have a Podfile
Add the pod 'AtomicXCore' dependency to your project's Podfile:
target 'YourProjectTarget'do
# Other existing Pod dependencies...
# Add pod 'AtomicXCore' dependency
pod 'AtomicXCore'
end
Navigate to your .xcodeproj directory using cd in the terminal, then run pod init to create a Podfile. Afterward, add the pod 'AtomicXCore' dependency:
# If your project directory is /Users/yourusername/Projects/YourProject
# 1. cd to your .xcodeproj project directory
cd /Users/yourusername/Projects/YourProject
# 2. Run pod init. After execution, a Podfile will be generated in your project directory.
pod init
# 3. Add pod 'AtomicXCore' dependency to the generated Podfile
target 'YourProjectTarget'do
# Add pod 'AtomicXCore' dependency
pod 'AtomicXCore'
end
2. Install Components:
In your terminal, cd to the directory containing your Podfile, then run:
pod install
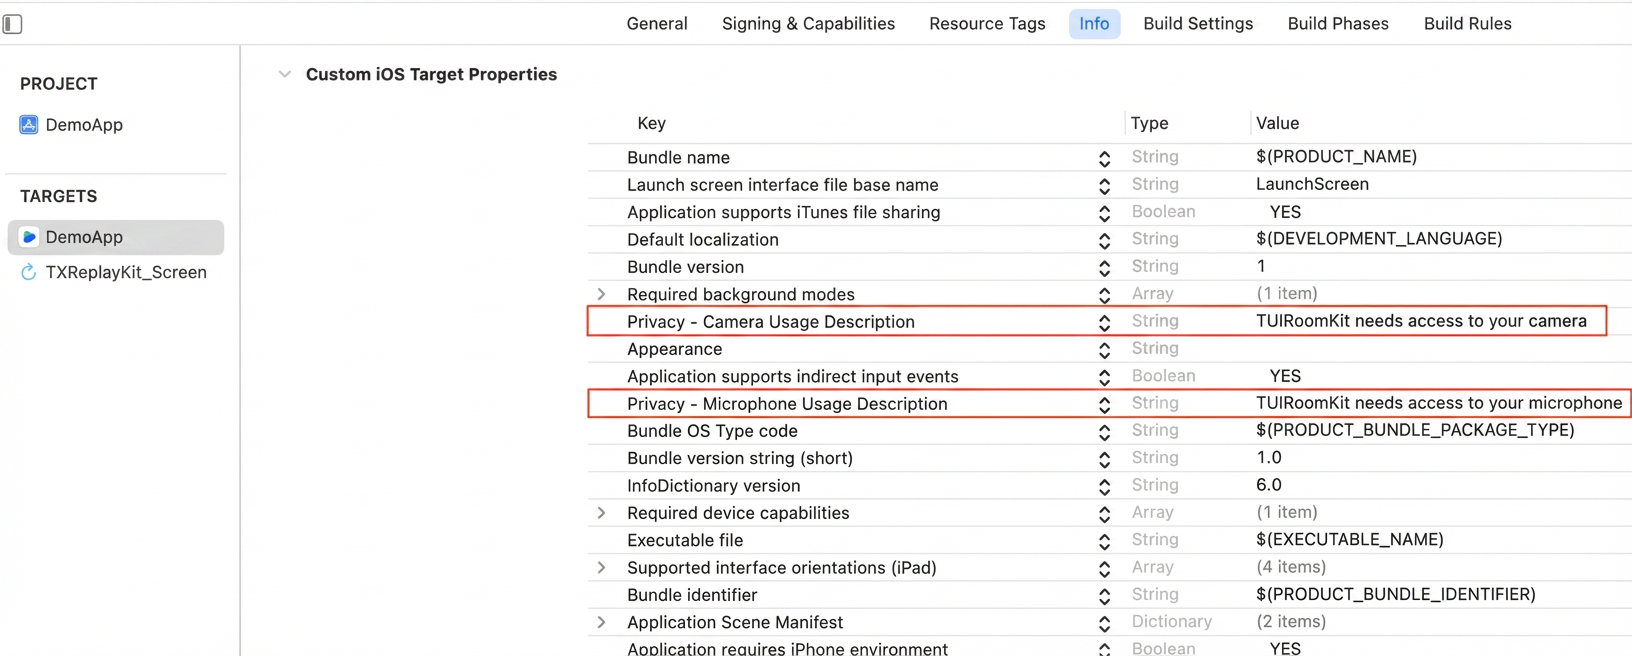
3. Configure App Permissions: Add camera and microphone usage descriptions to your app's Info.plist file.
<key>NSCameraUsageDescription</key>
<string>TUIRoomKit needs access to your camera</string>
<key>NSMicrophoneUsageDescription</key>
<string>TUIRoomKit needs access to your microphone</string>
Step 4: Implement Login Logic
Call LoginStore.shared.login in your project to complete login. This step is required before using any feature of AtomicXCore.
Important:
For best results, call LoginStore.shared.login only after your own user account login is successful. This ensures clarity and consistency in your login flow.
importAtomicXCore
funclogin(){
LoginStore.shared.login(sdkAppID:1400000001,// Replace with your project's sdkAppID
userID:"test_001",// Replace with your project's userID
userSig:"xxxxxxxxxxx"){ result in// Replace with your project's userSig
Unique user identifier. Use only English letters, numbers, hyphens, and underscores. Avoid using simple IDs like 1 or 123 to prevent multi-device login conflicts.
userSig
String
Authentication ticket for Tencent Cloud.
For development: Use GenerateTestUserSig.genTestSig or the UserSig Assistant Tool for a temporary UserSig.
Completion callback. Returns the result of enabling the camera. If enabling fails, returns error code and message.
3. End a Room
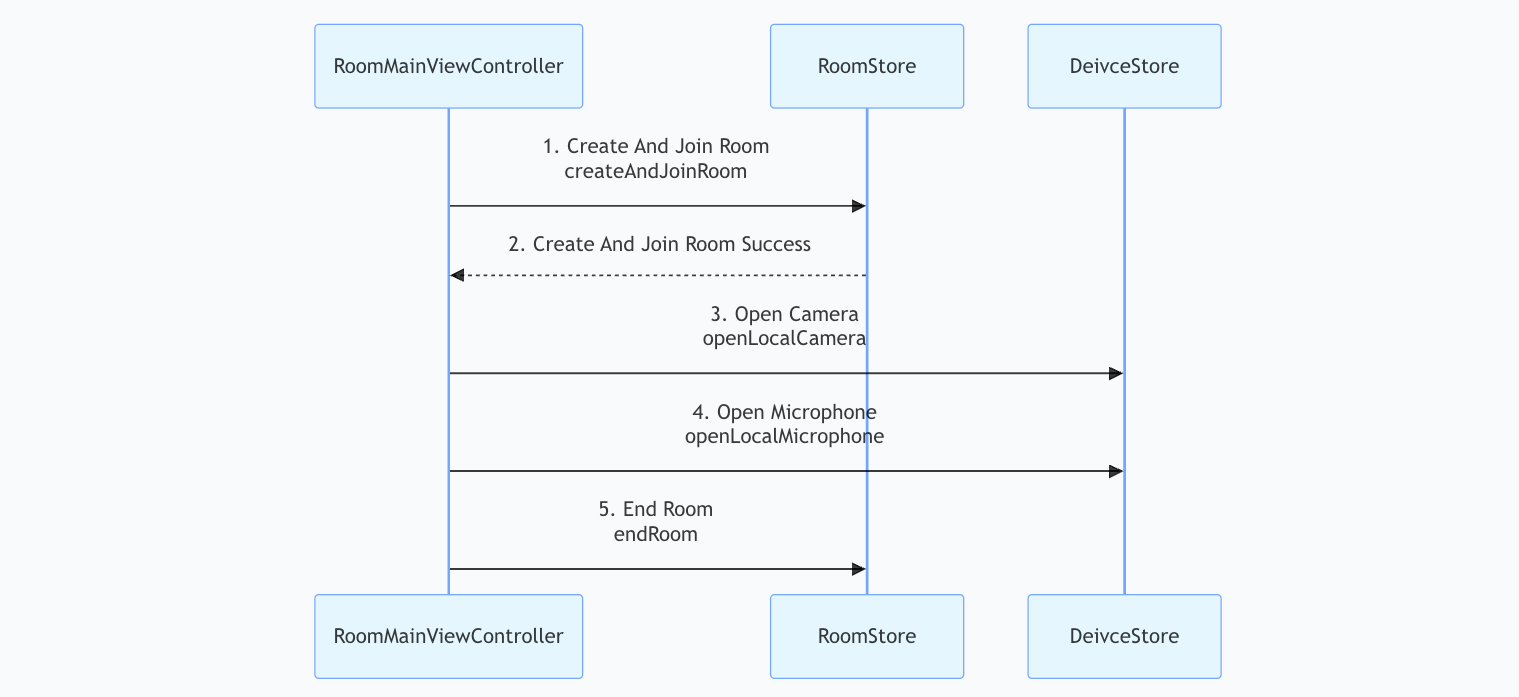
To end a room, call the endRoom API from RoomStore. All participants will receive a room ended event.
importUIKit
importAtomicXCore
// RoomMainViewController represents the main view controller of the room
classRoomMainViewController:UIViewController{
privatelet roomID:String
publicinit(roomID:String){
self.roomID = roomID
super.init(nibName:nil, bundle:nil)
endRoom()
}
requiredinit?(coder:NSCoder){
fatalError("init(coder:) has not been implemented")
}
// End the room
privatefuncendRoom(){
// endRoom API permanently ends the current room.
// Note: Typically, only the host (owner) can perform this operation. After execution, all members are removed from the room and audio/video capture is forcibly stopped.
RoomStore.shared.endRoom {[weakself] result in
guardletself=selfelse{return}
switch result {
case.success():
print("Room ended successfully")
case.failure(let error):
print("Failed to end room [Error code: \(error.code)]: \(error.message)")
}
}
}
}
Step 2: Participant Joins a Room
Participants can join a room in just a few steps to interact with others in real-time audio/video.
1. Join a Room
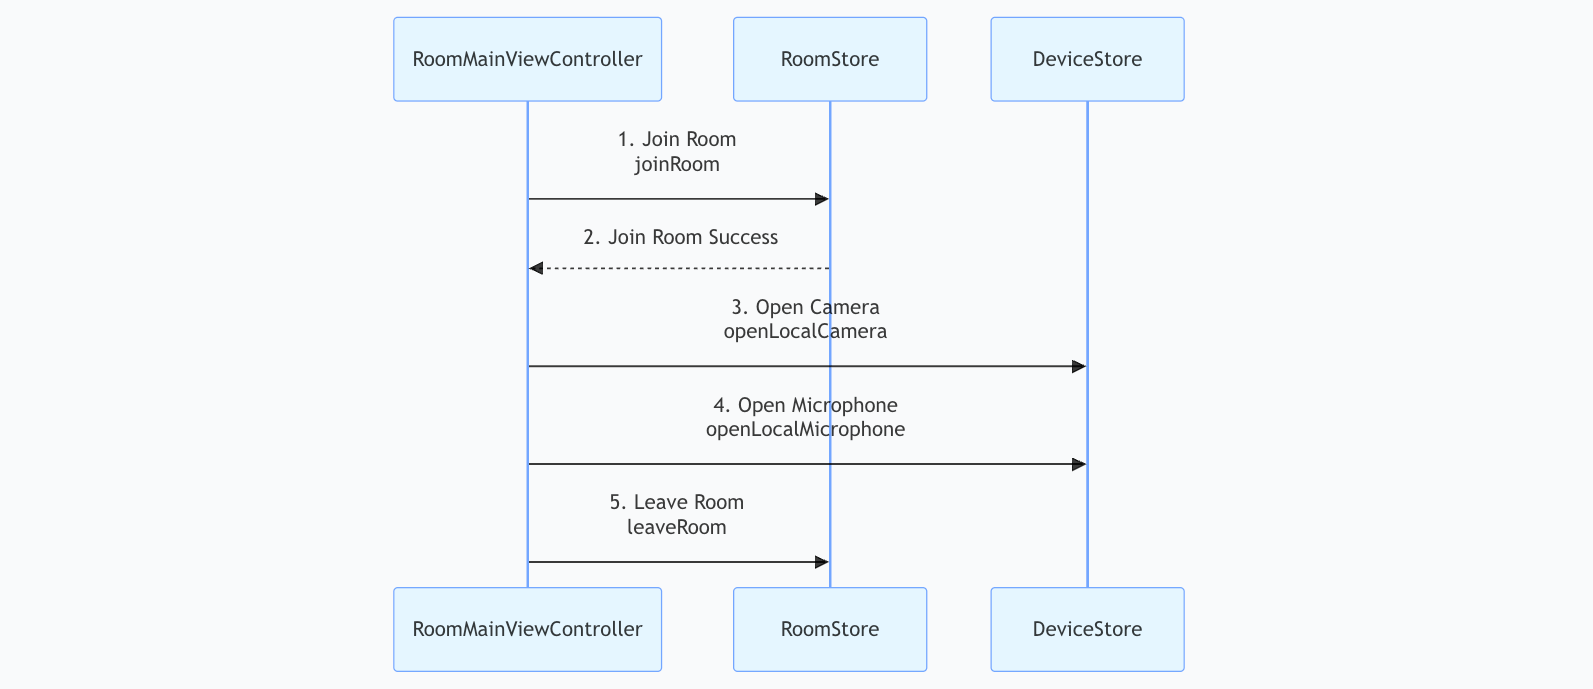
To join a room, call the joinRoom API from RoomStore. Other participants will receive a participant joined event notification.
importUIKit
importAtomicXCore
// RoomMainViewController represents the main view controller of the room
classRoomMainViewController:UIViewController{
publicinit(roomID:String, roomType:RoomType){
super.init(nibName:nil, bundle:nil)
joinRoom(roomID: roomID, roomType: roomType)
}
requiredinit?(coder:NSCoder){
fatalError("init(coder:) has not been implemented")
To leave a room, call the leaveRoom API from RoomStore. Other participants will receive a participant left event notification.
importUIKit
importAtomicXCore
// RoomMainViewController represents the main view controller of the room
classRoomMainViewController:UIViewController{
privatelet roomID:String
publicinit(roomID:String){
self.roomID = roomID
super.init(nibName:nil, bundle:nil)
leaveRoom()
}
requiredinit?(coder:NSCoder){
fatalError("init(coder:) has not been implemented")
}
// Leave the current room
privatefuncleaveRoom(){
// 1. Business logic
// leaveRoom API is used for regular members or host to leave the room.
// Unlike endRoom, when the host calls leaveRoom, only they leave; the room remains.
// 2. Call RoomStore leaveRoom API
// This operation stops audio/video streaming and notifies the server to remove the current user from the room
RoomStore.shared.leaveRoom {[weakself] result in
guardletself=selfelse{return}
switch result {
case.success():
print("Left room successfully")
case.failure(let error):
print("Failed to leave room [Error code: \(error.code)]: \(error.message)")
}
}
}
}
Step 3: Bind Video View
The RoomParticipantView component in AtomicXCore SDK provides a complete solution for video rendering. It supports real-time display of both local camera feeds and remote participant streams, and is easy to integrate.
Tip:
RoomParticipantView is the core view component for rendering participant video streams in the room. For more flexible video layout options, see TUIRoomKit open source project, specifically RoomView.swift.
Implementation:
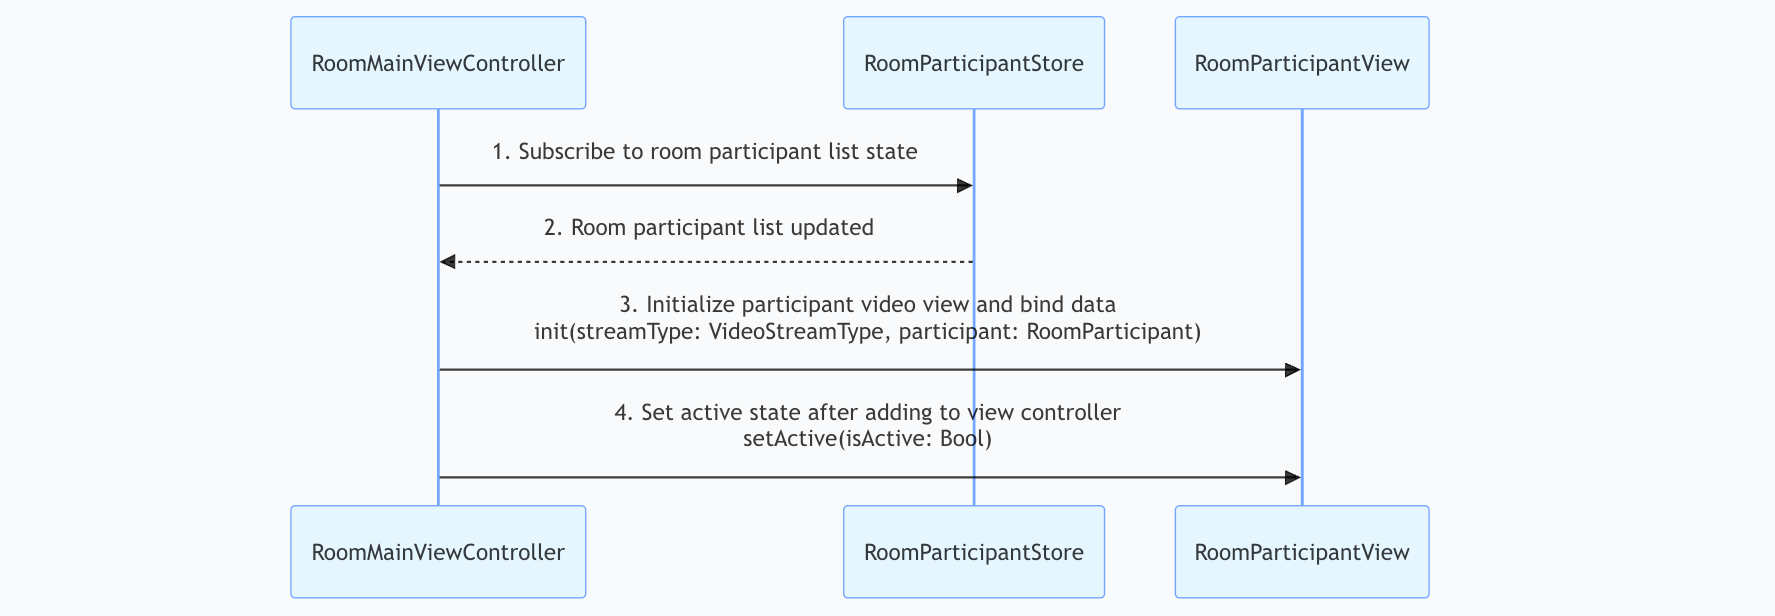
1. Subscribe to Data Layer: Listen to RoomParticipantStore.state.participantList for participant state changes.
2. Automatic State Sync: When the participant list updates, the system automatically syncs the participantList state.
3. Initialize View: Create RoomParticipantView instances based on participant data and bind video rendering logic.
The host can manage other participants in the room, such as setting admins, removing participants, and controlling individual participant audio/video status.
Complete room lifecycle management: create and join / join / leave / end room / update and get room info / schedule room / call external members / listen to passive room events (such as room dissolution, room info update, etc.).
Participant management within the room: set admin / transfer host / get participant list / remove from room / participant device control (invite to enable camera, microphone, etc.) / request to enable device (e.g., request to enable camera, microphone, etc.).
RoomParticipantView is bound to another participant's info and the correct video stream type, but the video is still not visible?
Check setActive: Make sure the current RoomParticipantView is visible on screen and that RoomParticipantView's setActive: true is called correctly.
Check RoomParticipant: Confirm that the cameraStatus of the RoomParticipant set in RoomParticipantView is on.
Check Network: Verify that the device's network connection is normal.
Rsync fails to copy third-party library resources due to insufficient permissions
For example, when integrating the SnapKit framework with Xcode, you may encounter the following build error:
rsync(xxxx):1:1: SnapKit.framework/SnapKit_Privacy.bundle/: mkpathat: Operation not permitted
Cause
Xcode's user script sandbox mechanism restricts the rsync script's write permissions to the SnapKit.framework resource files during the build process, causing the SnapKit_Privacy.bundle in the framework to fail to copy.
Solution Steps
1. After disabling user script sandboxing, open your Xcode project, go to Build Settings, search for User Script Sandboxing (or ENABLE_USER_SCRIPT_SANDBOXING), and change its value from YES to NO.
2. Clean and rebuild the project by selecting Product → Clean Build Folder to clear the project cache, then recompile and run.
Contact Us
If you have any questions or suggestions during integration or usage, please contact info_rtc@tencent.com to submit feedback.